Earlier this month we looked at how to make sense of a Google Analytics report. Now we’re going to take a step further and explore Analytics’ Advanced Segments tool. This tool allows you to segment your website users into separate, defined channels to see how different audience groups are interacting with your site. Advanced Segments was released about a year and half ago but many still aren’t taking advantage of its functionality.
For the NEW version of Google Analytics click here.
Why Audience Segments?
The ability to analyze your reports by particular user groups and compare one traffic channel to another is extremely useful and helps to make your Analytics reports more meaningful.
If you’re running a social media campaign, for example, the ability to compare traffic coming from Twitter to traffic from Facebook can give you insight into how these different groups are interacting with your site. Once you have this information, you can see where your efforts should be focused. For instance, if your segmented report shows you that your site gets most of its traffic from Facebook but traffic from Twitter spikes on the weekends, you may want to focus most of your marketing outreach on Facebook but do some Twitter outreach on the weekends.
How to Set up Advanced Segments
Sign in to Google Analytics.
In the Dashboard screen, above the date range, there’s an Advanced Segments tab.

By default, this is set to All Visits. To set user segments, click on the arrow next to All Visits and this will open up the Advanced Segments screen.
From here, you can select from predefined segments like “Search Traffic” and “Referral Traffic” or you can create your own custom segments, by clicking on “Create a new advanced segment.”

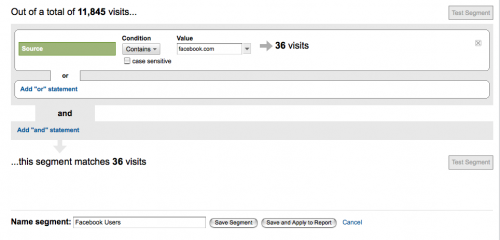
Once you’re in this screen you can drag and drop to build your own segments. To create a segment for Facebook traffic, under Dimensions choose Traffic Sources and drag “Source” to the dimension or source box. Under condition choose “Contains” and in value type in “facebook.com”. Next, name your segment (if you don’t the segment won’t work). Note: choosing “add ‘or’ statement” will segment visitors from Facebook with another variable.
You can use these steps to set up segments for traffic coming from all of your social media channels.

Click Test Segment to see if you’ve set this up correctly and then click Save Segment.
This will take you back to the Dashboard. To apply your custom segment to your report, go back to the Advanced Segments screen. Here, you can choose to compare regular visitors to Facebook visitors by clicking on your new segment (under Custom Segments). Note: by default, all reports will include All Visits. Click Apply.
Your Analytics report now compares your regular traffic to your Facebook traffic. The blue line represents All Visits and the yellow line represents Facebook visits. In this case, Facebook represents a small minority of the site’s traffic.

For further instructions on how to set up Advanced Segments, Google has a video.
And if you’re an advanced user with a Drupal site, this video shows you how to take the functionality of Advanced Segments even further.
In 2011, Google Analytics introduced a new version with enhanced features. For instructions on Advanced Segments in the New Version, see:
How to use Google Analytics Advanced Segments


